Oh my goodness, let me tell you about one of my absolute favorite indulgences: Butterbeer Cheesecake! Picture this: you’re cozied up with a slice of creamy, dreamy cheesecake that tastes like liquid gold, and you can’t help but feel like you’re in your very own enchanted world. This delightful dessert is inspired by the magical Butterbeer from the wizarding world and is perfect for any occasion—be it a birthday party or just a cozy night in by yourself (because hey, I don’t judge!).
I first whipped up this heavenly treat during a snowy evening when I decided to have a little Harry Potter movie marathon with friends. We all dug in, and let’s just say there wasn’t a crumb left! What’s great about this recipe is how it combines that rich, buttery flavor with the sweetness of the cheesecake—it’s like a warm hug in dessert form.
What’s in Butterbeer Cheesecake?
Let’s break it down:
Graham Cracker Crumbs: These make up the crust of the cheesecake, giving it that perfect crunch. I usually buy the store-bought ones, but you can crumble up your own if you’re feeling adventurous!
Unsalted Butter: Just the right amount helps bind the crust together. I prefer unsalted so I can control the salty flavor.
Cream Cheese: The star of the show! This adds richness and creaminess. Be sure it’s softened for easier mixing—no one wants lumps in their cheesecake!
Brown Sugar: This adds that lovely caramel-like flavor that’s oh-so-important in Butterbeer.
Granulated Sugar: A touch of sweetness to balance things out. It’s a classic combo with the brown sugar.
Vanilla Extract: Because why not? It adds depth and flavor to the cheesecake, making it extra delicious.
Eggs: These bring everything together, giving the cheesecake that silky texture we all adore.
Butterscotch Sauce: This heavenly concoction isn’t just for drizzling; it amps up that Butterbeer flavor.
All-Purpose Flour: Just a couple of tablespoons help stabilize our cheesecake and prevent it from cracking.
Salt: A pinch enhances all the flavors beautifully!
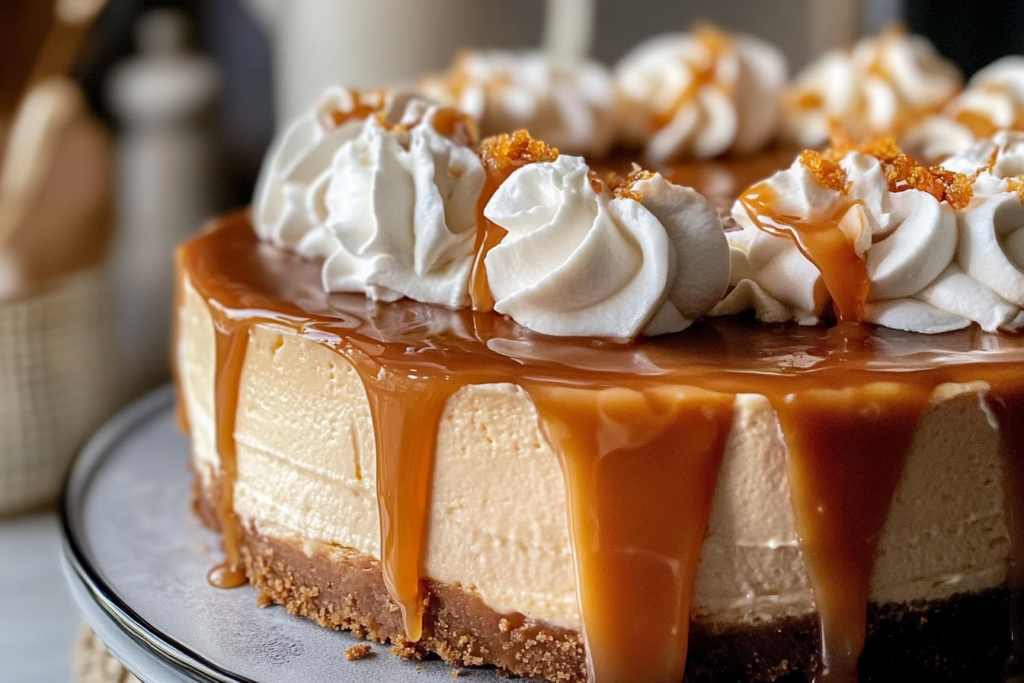
For that extra theatrical touch, I often whip up an optional but totally worth it homemade butterscotch sauce to drizzle on top! Nothing says “I’m fancy” quite like homemade toppings, right?
Is Butterbeer Cheesecake Good for You?
Now, let’s talk about health, shall we? While this cheesecake might not win any awards for being low-calorie, it does have its moments.
Cream Cheese: Packed with calcium and protein, it can actually have some health benefits! Just remember moderation is key.
Brown Sugar: It has more minerals than white sugar, but it still counts as a treat, so enjoy it in small doses.
Of course, if you’re looking for a healthier alternative, you can try using a lighter cream cheese or coconut cream for a dairy-free version. Just keep in mind that texture and flavor might vary a bit.
Ingredients List
This recipe serves about 10-12 slices:
**For the Cheesecake:**
– 1 ½ cups graham cracker crumbs
– ½ cup unsalted butter, melted
– 2 cups cream cheese, softened
– 1 cup brown sugar
– ½ cup granulated sugar
– 1 tablespoon vanilla extract
– 4 large eggs
– ½ cup butterscotch sauce
– 2 tablespoons all-purpose flour
– ½ teaspoon salt
**For the Butterscotch Sauce:** (optional for drizzling)
– ½ cup brown sugar
– ½ cup heavy cream
– ¼ cup unsalted butter
– 1 teaspoon vanilla extract
**For Topping:**
– Whipped cream (for decoration)
– Gold sprinkles (optional)
How to Make Butterbeer Cheesecake?
Alright, let’s get our bake on!
1. **Preheat the Oven**: First things first, preheat your oven to 325°F (163°C).
2. **Prepare the Crust**: In a medium bowl, combine the graham cracker crumbs with melted butter. Press this mixture firmly into the bottom of a 9-inch springform pan. Bake for about 10 minutes, then remove and let it cool.
3. **Make the Cheesecake Filling**: In a large mixing bowl, beat the softened cream cheese until smooth. Gradually mix in the brown sugar and granulated sugar until creamy.
4. **Add Eggs and Flavors**: Add the eggs one at a time, mixing just until incorporated. Then mix in the butterscotch sauce, vanilla extract, flour, and salt until everything is smooth and luscious.
5. **Bake the Cheesecake**: Pour the cheesecake filling over the cooled crust in the springform pan. Bake for 55-60 minutes, or until the center is set but still a bit jiggly.
6. **Cool the Cheesecake**: Turn off your oven and crack the door, letting the cheesecake cool inside for about an hour. This helps prevent cracks. Once cool, let it sit at room temperature, then refrigerate for at least 4 hours, or overnight if you can resist!
7. **Make the Butterscotch Sauce**: In a small saucepan over medium heat, combine the brown sugar, heavy cream, butter, and vanilla. Stir until the sauce smooth and bubbly, then remove from heat to cool slightly.
8. **Assemble and Serve**: Once the cheesecake is fully chilled, drizzle that glorious butterscotch sauce over the top. Get creative with the whipped cream on the sides, and if you want to sparkle a little—sprinkle on those gold sprinkles like a true wizard!
9. **Slice and Enjoy**: Carefully remove the sides of the springform pan, slice your cheesecake, and serve chilled. Go ahead, savor every bite!
Sweet Tips for Your Butterbeer Cheesecake
– If you want to make things easier, you can use store-bought butterscotch sauce instead of making your own.
– For a chocolate twist, try adding cocoa powder to the crust or mixing in some chocolate chips into the cheesecake filling!
– This cheesecake can be made ahead; it tastes even better the next day as the flavors develop and mellow out.
I can hardly wait for you to dive into this Butterbeer Cheesecake! Seriously, you won’t be able to stop raving about it. When you make it, don’t forget to come back and share your thoughts with me. Happy baking!


